Thursday, May 24, 2012

Manchego Cheese and Cherry Tomatoes with Toasted Walnuts and Thyme

Wednesday is farmers market day. We have a great one 4 blocks away from home that is open every Wednesday– and shopping at a farmers market is way more fun than an impersonal grocery store. It was also perfect timing as we had some very special guests coming for dinner that night itself– my fabulous aunt from Brazil, her daughter (also fabulous) and niece (whom I just met and is no less fabulous!). 
Several items on the menu were repeat recipes, such as the Chorizo with Wild Mushrooms, Lobster Paella, and Dulce de Leche Brownies. This was a quick last minute tapa that I added to the menu, inspired from José Andres's book, Made in Spain. His recipes are always YUM and you can never go wrong with it. 

Andres' recipe asked for the tomatoes to be grated, skin discard (the traditional way it's done in Catalan) but since I only had cherry tomatoes in stock, I roughly crushed them using a mortar and pestle. The recipe also asked for rosemary, but I used thyme instead. It's easy to make these swaps if you follow Mario Batali's simple saying: What grows together, goes together. Thyme and rosemary are both herbs used frequently in Spanish cooking. 

Ingredients
1 cup cherry tomatoes
1/4lb manchego cheese (or any hard Spanish cheese), cubed to bite-size pieces
1/4 cup toasted walnuts
2 tbsp Spanish extra virgin olive oil
4–5 sprigs of fresh thyme
Salt and pepper, to taste

Method
  • Using a mortar and pestle roughly crush the cherry tomatoes to release the juices.
  • Toss the tomatoes with the cheese, toasted walnuts, olive oil and thyme.
  • Season with salt and pepper.

Wednesday, May 23, 2012

Gooey Chocolate Brownies with Dulce de Leche


I am a brownie obsessed girl (if you haven't already realized this while reading this blog!). And whenever my fathers clients from Buenos Aires, Argentina visited us in Mumbai, India they could not enter our doorstep with a good supply of Dulce de Leche. And if I could have, I would have eaten the heavenly caramel with a spoon right out of the jar. It was spooned over ice cream (OMG!), rolled in thin crepes with caramelized sugar atop (remember those Sunday morning pancake breakfasts I talked about?), on top of bread and so much more.


So when Purple Foodie featured this fabulous brownie recipe from Baked, NYC, how could I not bake these? Plus, she said that it was super rich, gooey, intensely chocolatey, which made it even harder to resist! 


Purple Foodie spread three toppings of chocolate chips, dulce de leche and walnuts on a third of the batter. It gave her one batch of brownies with three varieties. However, since dulce de leche and I have our true love, I decided she was the winner of it all! 


Adapted from: Baked
Yield: 24 bars
1 1/4th cup all-purpose flour
1 tsp salt
2 tbsp dark unsweetened cocoa powder
11 oz. / 310g dark chocolate (60-72% cacao)
1 cup / 2 sticks / 225 g butter
2 cups / 400g granulated sugar
5 large eggs
2 tsp vanilla extract
Additional topping options:
Walnuts
Chocolate chips
Dulce de Leche
Smoked Sea Salt (I haven't tried this, but will be doing so shortly)
  1. Preheat oven to 350°F/175°C. Butter a 9×13 baking pan or line it with baking parchment (I used a 9×9 square, light coloured tin).
  2. Whisk the flour, salt and cocoa together. If you’re going to be using salted butter, you should skip the salt here.
  3. In a large bowl put together the butter and chocolate and set it over a pan of simmering water until the chocolate and butter are completely melted and smooth. Add the sugar and stir so that it dissolves faster and is well combined.
  4. Once the mixture is at room temperature, add in 3 eggs and whisk until combined. Add the remaining two eggs and vanilla.. Do not overbeat!
  5. Fold in the flour mixture into the bowl ful of chocolate goodness until just combined. Again, don’t overdo – better to have a few streaks of flour than an overmixed batter.
  6. Pour the batter into the tin and top with dulce de leche spooned over (this being dense will sink into the brownie batter giving you gorgeous pockets of South American goodness in every bite).
  7. Bake for 30 minutes until a wooden skewer comes out without being drippy (it won’t be all that clean in the dulce de leche section – this will always be gooey!)
  8. Remove from the oven and let it cool completely before cutting into pieces.
Tip from Purple Foodie: It’s recommended to remove the brownie from the oven when it is just slightly underdone. But hold the horses and wait until it’s completely cooled to cut.
Storage: Tightly covered, these will keep for 3 days. Sometimes these even get better after 24 hours. But don’t really bother because they’ll be gone in a flash.

Tuesday, May 1, 2012

Chocolate Cake with the Yummiest Vanilla Buttercream


Having our sons first birthday was huge deal for us. And I would have normally custom ordered a cake to suit the theme. But I decided to be super-mom and do everything for the party, including baking and decorating the cake, with gum paste, an ingredient new to me and do more than I really should have committed myself too, with a toddler running around the house. We ordered pizza for kid-friendly food, but the rest was made by me. Still not sure how super-mom I considered myself to be, because at the end of it all, I felt like I had been hit by a truck! 

But heck, it was worth it! And a BIG thank you to my fabulous helpful cousins Pooja and Reshma. From start to finish, the cake took me 8 long hours. Although I repeatedly said never again, I will probably do it. But just not as big a cake. It takes longer to frost, you need way more buttercream frosting and it's just a bigger project on the whole! 

The recipe below is the original recipe from Alice's TeaCup– one of my favorite high tea places and also my favorite baking cookbook. You will find many recipes from this book on this blog. 

To feed the party, I baked two batches of this recipe in a 12-inch round cake pan and then made four batches of the buttercream. 

The gorgeous penguin topper was made to order by FondantFads
The rest of the cake and decoration was done by me. The circles to decorate were cut out from gum paste and layered on top. 

After a very basic cake decorating class from Sugar Flower Cake Shop I learnt the basics of frosting a cake with buttercream. Go thick. Go generous. Do many layers, by letting it set in the fridge for 15–20 minutes between each layer. Buttercream obviously contains butter, and butter will harden in the refrigerator, which makes layering on the next layer easier. It also helps make for a smoother cake along with a yummier cake! 

I baked the cake the day before and left it uncovered in the fridge. Normally you would have covered it to not dry it out, but given that the buttercream was so thick, the cake was still moist the next day.

Chocolate Cake with the Yummiest Vanilla Buttercream
Makes one 8-inch 3 layer cake
To quote from the book: "This is the best chocolate cake ever— no contest. It’s thoroughly moist (thanks to the coffee in the batter), with not too rich a chocolate and not too buttery a frosting. It has been praised online by our new friends Blondie and Brownie of Just Desserts NYC: “The buttercream is thick and sweet, generously spread between each layer. The cake is so moist, it tastes like an Oreo cookie dunked in milk. It is the best cake in NYC.” Lauren says most cakes are just a conduit for the frosting, but not ours… see for yourself!"
2 cups sugar
1 3/4 cups all-purpose flour
3/4 cup unsweetened cocoa powder (we recommend Hershey’s)
1 1/2 teaspoon baking soda
1 1/2 baking powder
1 teaspoon kosher salt
1/4 cup sour cream
2 eggs
1 cup whole milk
1/2 cup canola oil
1 teaspoon pure vanilla extract
3/4 cup hot brewed coffee
  1. To make the cake, preheat the oven to 350F, and have ready three 8-inch round nonstick cake pans.
  2. In a large bowl, sift together the sugar, flour, cocoa powder, baking soda, baking powder, and salt.
  3. With a mixer on medium speed, add the sour cream, eggs (one at a time), milk, oil, and vanilla to the dry ingredients, and keep mixing for exactly 2 minutes. Scrape down the bowl. With the mixer on low speed, slowly drizzle in the hot coffee, mixing until the batter is blended and smooth. It will be very liquidy– this is good!
  4. Divide the batter evenly among the cake pans, and bake for 20 to 25 minutes, or until a toothpick inserted into the center of the cakes comes out clean. Set the layers aside on a wire rack to cool completely before removing from the pans and frosting.
  5. The build the cake, frost all three layers with the buttercream and then stack the layers; then frost the sides of the cake.
The Yummiest Vanilla Buttercream Frosting
4 sticks (2 cups) unsalted butter, at room temperature
2 pound confectioners’ sugar
4 tablespoons whole milk, at room temperature
1 teaspoon pure vanilla extract
With a mixer on medium speed, cream the butter in a large mixing bowl. Reduce the speed to low and add the confectioners’ sugar a little bit at a time, alternating with splashes of the milk and the vanilla. Mix until the frosting is smooth.

Creamy White Bean Dip


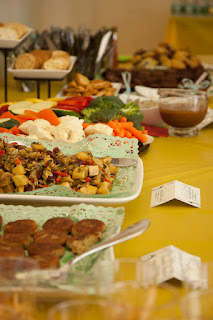
We recently celebrated my sons first birthday party. The big 1! The party ended up being a cross between a kiddie party and an adult tea party. Fun! But a lot of work. And in all that I forgot to take photograph of the dip I'm talking about here! Here is a photo of the spread involved, and that's all I can share until I make it again and photograph it. 


All I can say is that it's always been a crowd pleaser! This is a great dip recipe to have on hand: quick and easy, delicious and healthy, at the same time it's also easy to have most of these ingredients stored in your pantry. Thank you Bon Appétit for a fabulous recipe!


Makes 1 1/4 cups


Ingredients
1 15-ounce can cannelloni (white kidney beans), drained
1 1/2 tablespoons fresh lemon juice
1 1/2 tablespoons extra-virgin olive oil
1 large garlic clove, peeled
3/4 teaspoon cumin
1 tablespoon chopped fresh mint
1 tablespoon chopped fresh dill
1 teaspoon grated lemon peel


Puree first 5 ingredients in a processor until almost smooth.
Season with salt and pepper.
Transfer dip to a small bowl (can be prepared 1 day ahead. Cover and refrigerate.)
Mix mint, dill, and lemon peel in small dish; sprinkle over dip.